Overheating problems because of dust in your PC? Do you have to change the fans every three months because they get stuck? Is your computer in a dusty environment? Tired of cleaning the insides of your computer? Me too. This is a description of what I did to keep my computers dust-free.
Your dusty computer
If you have to work in a dusty environment (construction, manufacturing facilities, dirty bedroom, windy desert, etc.) and your computer must be running continuously (for example, it is a server), your computer will get full of dust and dirt inside, very quickly. That dirt can cause overheating problems, because they prevent the heat exchange between air and the components’ surfaces. Also, the fans eventually get stuck, worsening the overheating problem. And mechanical components (like your CD or DVD reader/writer or your floppy driver) will stop working pretty soon.
Why does this happen
Your computer is like a vacuum cleaner. It contains at least one fan which continuously move air from the inside of the computer to the outside environment. Yes, that’s the power supply fan, but your computer may contain one or more extra case fans. If it is moving air from the computer to the outside, how is it like a vacuum cleaner? Well, air has to enter somehow to be moved out again. That air enter through every hole in the computer, including your floppy and CDROM drives. If the external environment is dusty, the dust will enter the computer along with the air. But it won’t get out as easily.
Figure 1. Simplest ventilation setup, where air is moved out only by the power supply fan. The external air enter the computer case through ventilation holes and, to a lesser degree, through non-ventilation holes (including the floppy and CDROM drives). If the external air is dusty, the result is a dusty interior.
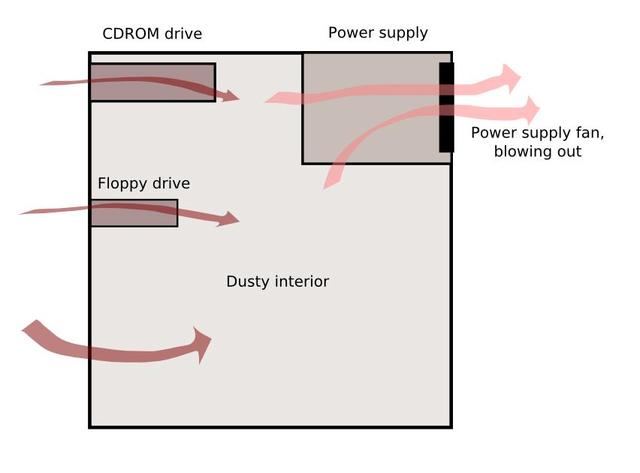
Figure 2. Common setup with one additional fan in the back side of the case, blowing air out from the case. The result is more air entering the case from the outside, through the ventilation holes and floppy/CDROM drives. The result if a dustier interior.
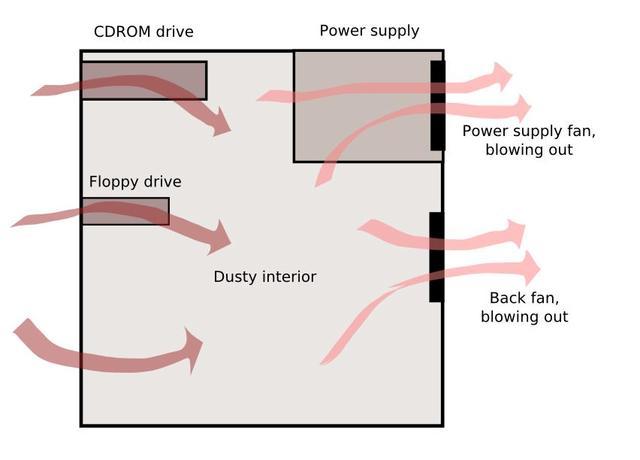
Figure 3. Another common setup, with two additional fans, one on the front (blowing air into the case) and one on the back (blowing air out from the case). Used by many people who need more cooling for their computers (gamers, overclockers, etc.) which cause a very dusty interior. This is the setup I used before.
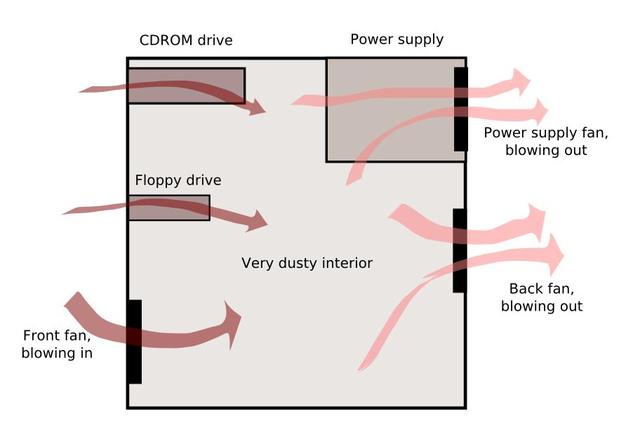
Figure 4. A variant of the above, now with both additional fans blowing air out. Most air enter through the ventilation holes and drives.
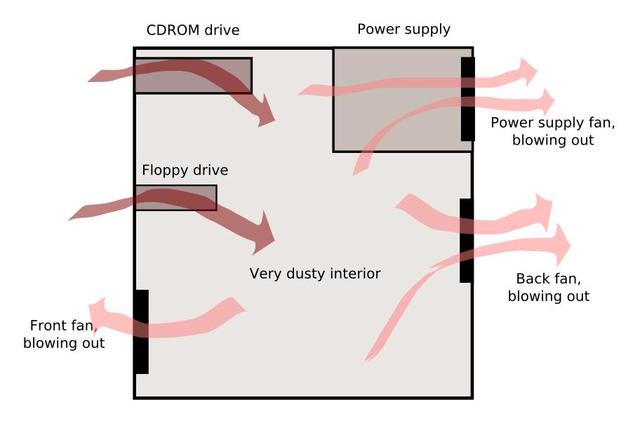
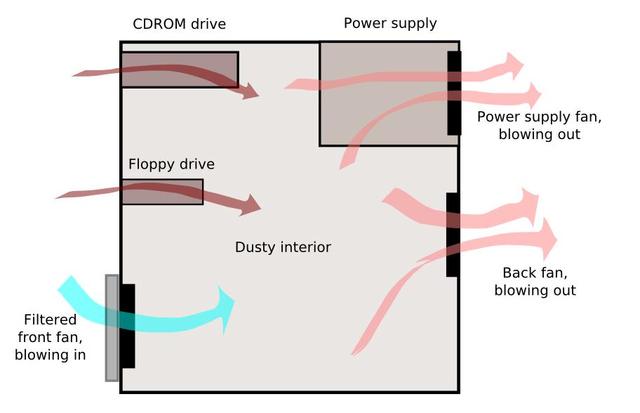
Figure 5. A variant of figure 3. The incoming air fan (front) is filtered. Usually, filters reduce drastically the volume of air that a fan can blow. So, most air is still being moved by the back fan and the power supply fan. The result is that the filtered air is not the main source of external air coming into the computer case, resulting in a dusty computer.
What you can do
1) Clean the environment.
The first and obvious way to prevent this is to keep the environment clean. For example, places with filtered air-conditioning systems, with people that clean the room everyday, with the computer case over a desk (like business offices) usually have computers with little dust inside, even after years of continuous use. Also, people who clean their house everyday, have no pets and have their windows closed most of the time, will have clean computers. Sometimes, just moving the computer to another corner in the room will change the amount of dust.
However, sometimes you cannot clean the environment as well as you wish:
- Dusty places (desert, beach, etc.).
- Dusty industry (factory, wood or metal workshop, construction, etc.).
- Computer at ground level (small desk/cubicle, desk design, etc.).
- Computer runs 24 hours a day (file/print server, monitoring station, etc.).
- No cleaning (lack of cleaning staff, lazy user, lot of kids, etc.).
- Hairy animals (pets, zoo, veterinary office).
- No air filtering (Air-conditioning too expensive or unfiltered).
2) Reduce the need of airflow.
You can get a low power consumption computer based on the VIA C3 processor (for example). Some designs don’t even need a fan and run pretty cool and quiet. Or build a computer with water-based cooling. Most designs don’t need a fan anywhere.
3) Isolate the computer.
The best solution I’ve found is to use one DirtBag (http://www.dirtbag.biz/ [1]), which is really a bag made of filtering material. You put the computer inside the DirtBag and the dust will never touch the computer. It looks ugly but for very dusty environments, there is no better solution. Dirtbags are not too expensive (around 18 to 25 US dollars) and if your computers are in the wood or construction industry, it can save you lot of money on maintenance costs.
4) Use filtered airflow.
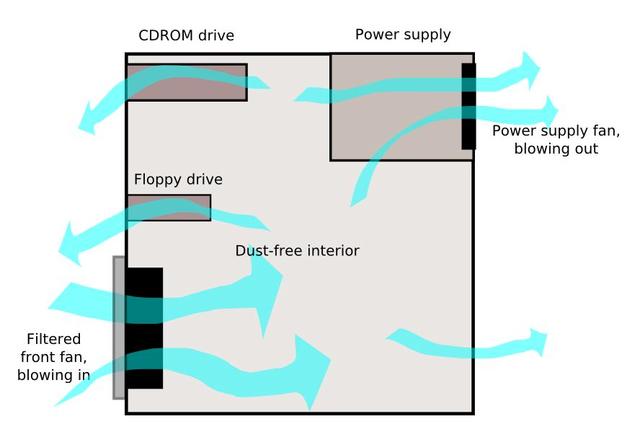
This is the solution I will be using. If all air entering the computer is dust-filtered, the computer will stay clean. How do you do that? Well, the idea is to move air into the computer faster than is taken out. Instead of using several fans to force air out the computer, we will user one single fan to force air into the computer.
Figure 6. This is the setup we will be using. The main source of air is a powerful fan that will blow lot of air into the computer case. The only additional fan will be that of the power supply. The idea is that all air entering the computer case will pass through this fan (and its filter). The result is that only clean air enters the computer, giving us a clean interior. The only variation we will use is that we will install the fan in the lateral face of the case, not in the front.
Design goals
- Dust-free airflow.
- Enough cooling performance.
- Minimal maintenance.
- Low power consumption.
- Cheap.
- Less noise.
Please note that “cheap” means “less than the cost of replacing two case fans, one CPU fan and the power supply twice in a year”.
Positive pressure
The theory is this: if the air is moved into the case, the air pressure will be higher inside the case. So, air will be forced to exit through any hole in the case. That is a positive pressure (inside the case).
The inverse situation would be to force the air to exit the case. So, air would be forced to enter through any hole in the case. That would be a negative pressure (inside the case).
The choice is simple: if the dusty air is in the external environment, it will be easier to filter the air that is forced into the case (with a positive pressure setup) than to try to filter every hole in the case where dusty air is trying to enter (with a negative pressure setup).
Single input airflow
A single point for input airflow means a single point of filtering, a single point to maintain, a less expensive setup.
The opposite would be to have several fans at several points, which would be harder to maintain and more expensive.
Filtered airflow
The filtering is done with an aluminum mesh cover and a vacuum filter. The aluminum mesh traps bigger particles while the vacuum filter traps smaller particles. If the vacuum filter is too restrictive, the fan will not be able to provide enough airflow, but we can just use the aluminum mesh cover.
Vibration isolation
The fan and the case are not in direct contact with each other. We will use a foam mounting pad to reduce vibration transmission from the fan to the case. The mounting pad is simply a layer of foam between the fan frame and the case, foamy enough to absorb vibrations and tight enough to not let escape air.
Required hardware
- A fan that can provide more than 100 CFM of airflow, at 12 VDC.
- An aluminum mesh fan cover.
- A fan grid.
- Several screws.
- A sheet of acoustic foam.
- A vacuum-cleaner filter.
To give you an idea about the 100 CFM flow, note that most fans in computer cases are rated below the 20 CFM, while most high performance CPU coolers have flows under 50 CFM. CFM stands for “cubic feet per minute”, meaning the amount of air the fan can move in one minute. So, for example, if the common tower cases have a capacity of around 4 cubic feet, a fan that blows 100 CFM can change the internal air around 25 times in one minute (on air exchange every 2.4 seconds). Of course that’s the ideal scenario, airflow dynamics can be far more complex.
Regarding the power required by the fan, even though we could have use a VAC fan too, we want to avoid the need to build a relay controller to power up the fan when the computer is turned on.
Shopping time!
After searching a while in the net, we found an online store named ThermalFX (http://store.thermalfx.com/ [2]) with good products at a good price. Also, all fans have their specifications listed in the ThermalFX site. We selected a Sunon KD1212PMB1-6A fan with the following specs:
- Sunonwealth Electric Machine Industry.
- 120 mm x 120 mm x 38 mm
- 12 volts DC at 0.56A (6.80 watts)
- 3100 rpm
- 108 CFM flow
- 42 dB noise
- Dual ball bearing
- 4-pin molex connector
I decided to buy this fan because have a good flow (>100 CFM). Other reasons were the option to use a 4-pin molex connector (even if I could have do that myself) and the power consumption (<10 watts). What I did not checked was the noise level. After installing it I found out that 42 dB is simply too high, though we solved it as explained later.
We also bought at ThermalFX the mesh cover, the fan grid, the foam sheet, the fan screws and a hole template transfer. We paid the following plus 8 USD for the shipping:
- Fan + connector: $13.49
- Sound Assassin acoustic foam: $3.00
- Hole template: $1.00
- 120 mm chrome fan grid: $1.49
- 120 mm aluminum mesh cover: $1.99
- 4 chrome fan screws: $1.00
Less than $30 USD.
Putting it all together
The first thing we have to decide is where to install the fan. The best place we found was the lateral case cover. Front and back sides of the case don’t have enough space or have no way to seal the air path. Installing in the lateral case cover have other advantages: easy access, better flow distribution, and more space available. As you can see in figure 7, we have some restrictions on the fan placement, because of the fan’s depth (~4 cm).
Figure 7. Lateral view of the interior of my server. You can see the front and back fans. Also, marked is the area we will use to install out lateral fan (we can only install it there because of the fan depth, ~40 mm).
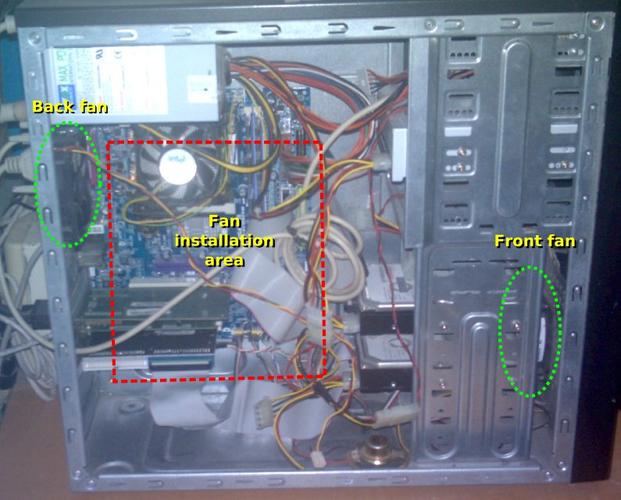
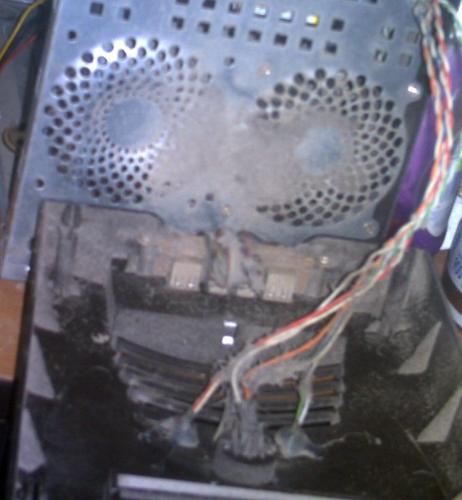
Figure 8. Front view of the interior of my server. You can see the dust in the area where the front fan was installed. This happened in less than 3 months.
First thing we do was to cut a circular hole in the computer case cover. I didn’t stick the hole template transfer (to avoid any residual glue after removal) but I used it as a guide to mark the case cover before cutting it.
Then we cut two squares of foam of 13×13 cm. We made a circular hole in each foam square. Those will be the fan mounting pads for vibration isolation and sealing; the idea is to reduce the vibration transmitted by the fan to the case cover (with the internal foam) and seal the border of the mesh cover (with the external foam).
Figure 9. Fan assembly in the case cover, formed by the fan, fan grid, mesh cover and foam mounting pads. We have to use eight screws. The tricky part is to keep the parts aligned while you insert at least one of the screws on the external side of the case cover.
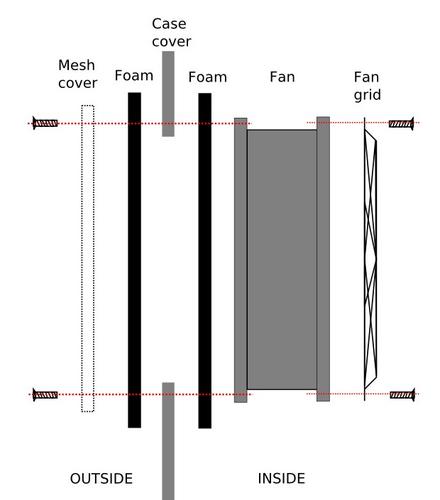
Why do we need the fan grid in the internal side of the fan assembly? This fan is pretty powerful (for a 12 cm fan), it can cause a nasty cut in the fingers and it can damage the power and data cables of the computer. As you can see in figure 7, there are lot of cables that can get damaged if they touch the fan.
Figure 9. Some of the required components: the fan, the grid, the mesh cover, the foam and the screws.
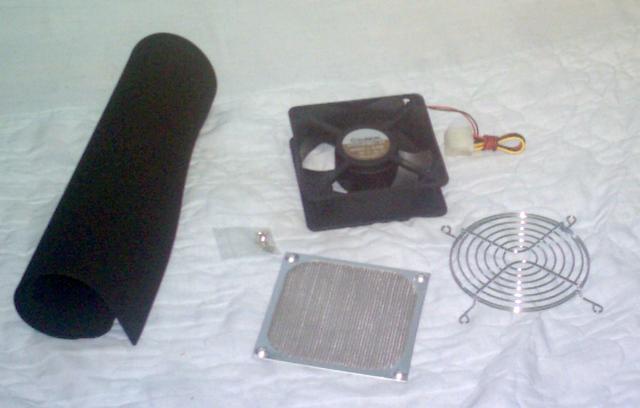
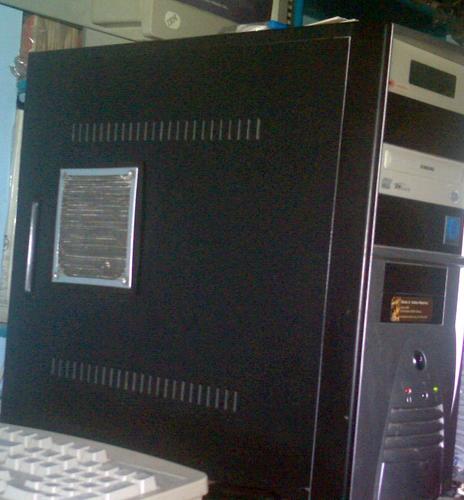
Figure 10. Outside view of the lateral case cover with the installed fan and mesh cover.
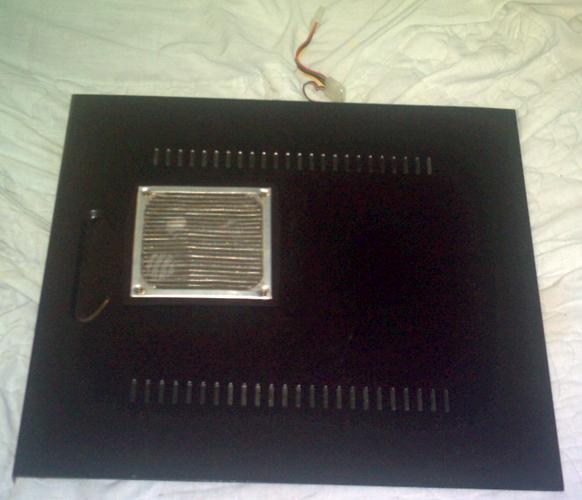
Figure 11. Inside view of the lateral case cover with the installed fan and mesh cover. You can see that there are two rows of venting holes near the top and bottom of the cover. They are sealed with duct tape.
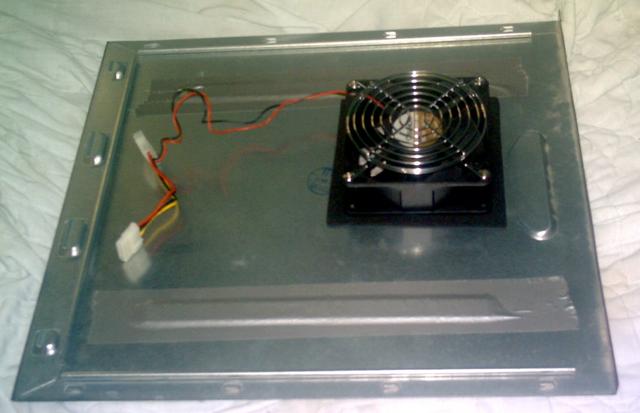
Figure 12. View of the server with the cover installed.
Results
After powering up the server, the fan start to blow air into the computer case. We can feel the air flowing out from the case trough the front and back venting holes (lateral holes in the case cover were sealed, as shown in figure 11).
We monitored the temperature of the processor to see if cooling was better or worse. We found that the processor was running 2 Celsius degrees cooler compared with the case without the lateral cover.
As mentioned above, I underestimated the noise level of this big fan. I don’t have an audio meter but the noise “feels” like twice as loud as my previous setup.
At the beginning of this article, I mentioned the use of a vacuum-cleaner filter to stop the smaller dust particles, but that a filter can reduce the effective airflow of the fan drastically. As I didn’t have a vacuum-cleaner filter at hand, I used a piece of a surgical mask as I have plenty of them available. I cut a 12×12 cm square and place it in front of the mesh cover. Thanks to the vacuum created by the fan on the mesh cover, my filter stays in place without the need of glue, tape, or something. However, please note that common surgical mask filtering is not very effective trapping small dust particles.
One benefit when using this filter is that the noise level dropped significantly. So this is the fix to the high noise level problem. (Another solution would have been to use a fan controller to reduce its speed).
Conclusion
So, did we reached our goals?
- Dust-free airflow: YES.
- Enough cooling performance: YES.
- Minimal maintenance: YES.
- Low power consumption: YES.
- Cheap: YES.
- Less noise: NO.
Well, 5 out of 6… not that bad.
Related links
- ThermalFX store [2].
- Dirtbag [1].